The common methods for cleaning salt from concrete are often the very cause of its destruction; the real solution is not about scrubbing the surface but strategically detoxifying the concrete from within.
- Aggressive pressure washing and hot water can force corrosive salts deeper into the concrete or cause thermal shock, leading to cracking and spalling.
- A successful strategy involves first dissolving the salt with low-pressure water, then gently rinsing it away, followed by sealing the concrete during the correct season (late summer in Quebec).
Recommendation: Prioritize a full, deep clean in the spring as soon as temperatures permit, and schedule sealing for late August or September to give the concrete the best possible defence before the next winter.
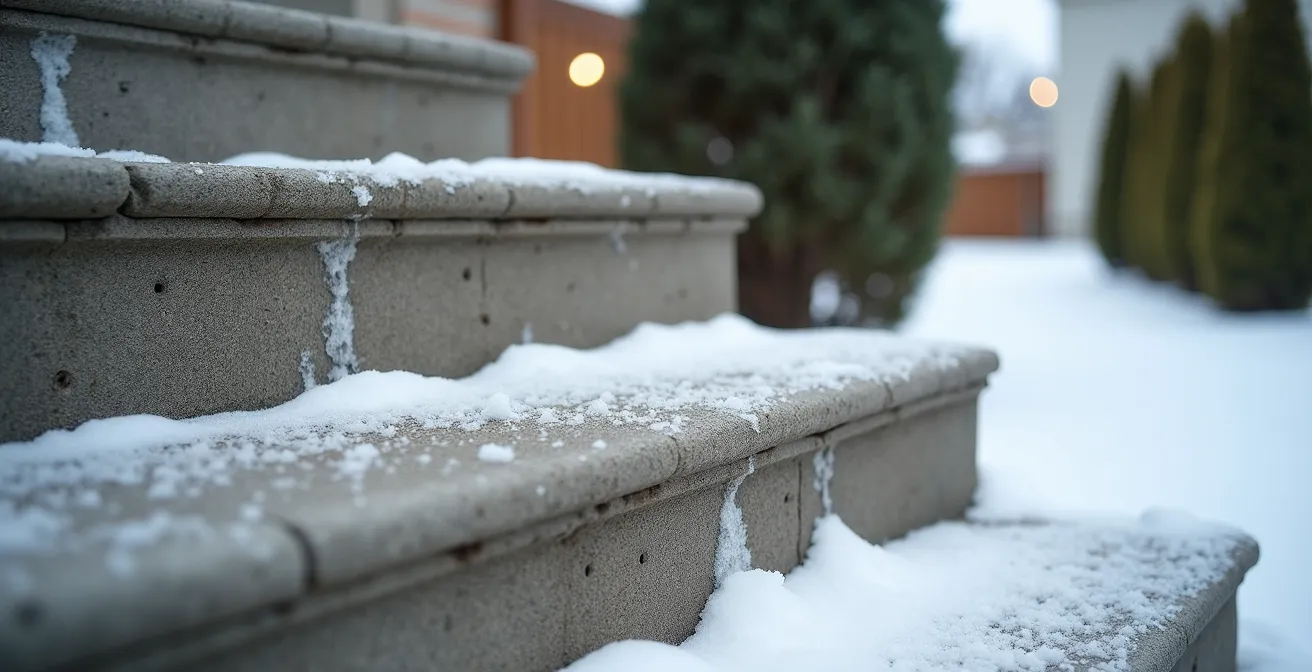
After a long Quebec winter, the sight of white, chalky stains blooming across your concrete steps is a familiar one. For many homeowners, the immediate reaction is to grab a stiff brush, a bottle of vinegar, or a powerful pressure washer to blast the problem away. These common “solutions,” however, often create a far more destructive and expensive problem. They can drive corrosive salts deeper into the concrete or etch the surface, creating pathways for water to enter and wreak havoc during the next freeze-thaw cycle. This is the fast track to spalling, cracking, and the eventual crumbling of your expensive masonry.
As a mason specializing in concrete restoration, I can tell you that removing salt isn’t a simple cleaning job. It’s a delicate extraction process. The real enemy isn’t the visible white powder, known as efflorescence, but the salt crystals that have penetrated the concrete’s porous structure. These crystals expand and contract with temperature and moisture changes, exerting immense internal pressure that literally pops the surface of your concrete apart from the inside out. True protection comes from understanding this mechanism and using techniques that coax the salt out, rather than driving it in.
This guide moves beyond the quick fixes. We will first explore exactly how salt acts as a silent destroyer of concrete. Then, we will detail the correct, professional techniques for safely washing it away without causing collateral damage. Finally, we’ll establish a clear timeline for cleaning versus sealing and look at preventative measures you can take to arm your concrete against the harshness of the coming winter. Forget scrubbing; it’s time to learn how to properly detoxify your concrete.
This article provides a detailed roadmap for protecting your concrete investment. Below, you’ll find a breakdown of each critical stage, from understanding the damage to implementing long-term preventative strategies.
Summary: A Homeowner’s Guide to Preventing Salt Damage on Concrete
- Why Does Salt Crystallization Cause Concrete Surfaces to Pop and Flake?
- How to Pressure Wash Salt Away Without Driving It Deeper into the Pores?
- Cleaning vs Sealing: What Is the Priority After a Heavy Salt Winter?
- The Hot Water Mistake When Washing Salt Off Frozen Surfaces
- How to Protect Landscape Plants from Salt Runoff During Removal Cleaning?
- Why Does Urban Pollution Degrade Brick Mortar Faster in Downtown Areas?
- Does Soft-Washing Keep Mold Away Longer Than Standard Power Washing?
- How to Prepare Your Garage Floor to Resist Salt Damage Before December?
Why Does Salt Crystallization Cause Concrete Surfaces to Pop and Flake?
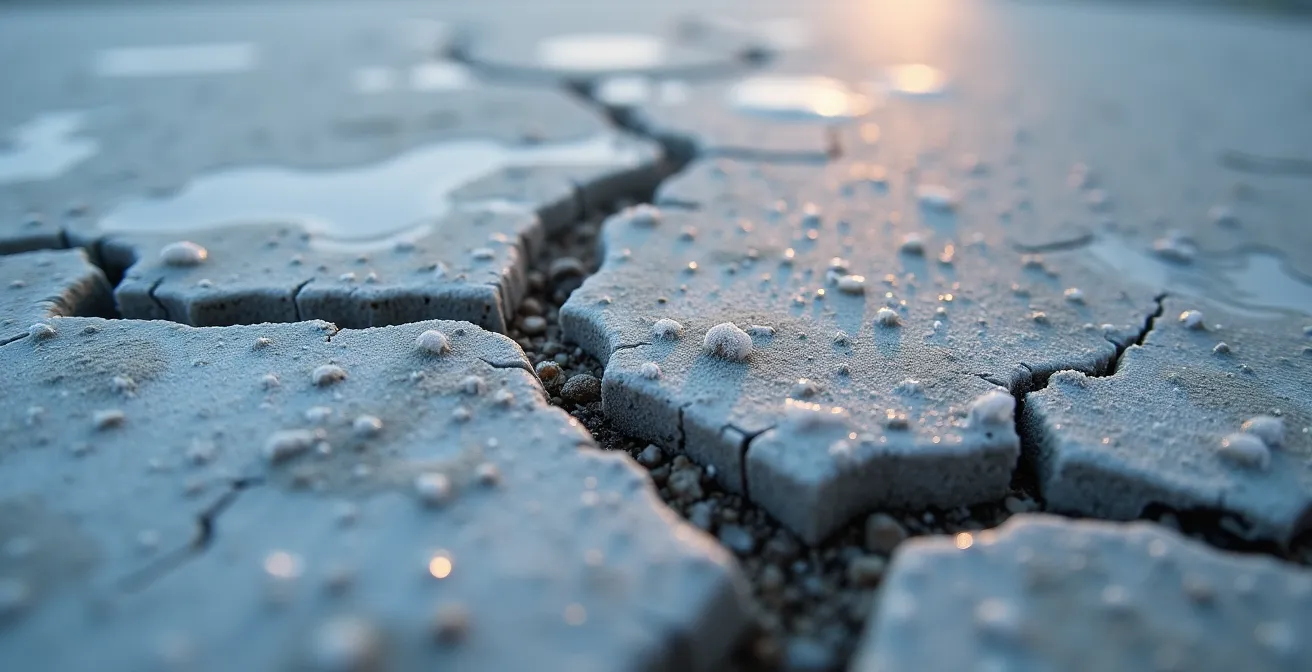
To understand why concrete fails, you have to think of it not as a solid rock, but as a hard sponge. It’s filled with a network of microscopic pores and capillaries that naturally absorb water. In Quebec, where municipalities can use up to 10 million tons of de-icing salts annually, this water is saturated with dissolved chlorides. When this saltwater solution is absorbed into the concrete, a destructive cycle begins. As the water evaporates, the salt is left behind and recrystallizes within the pores. These newly formed salt crystals are larger than their dissolved state, creating immense internal pressure that pushes against the surrounding cement paste.
This is where the infamous Quebec freeze-thaw cycle becomes a powerful accomplice to the salt. When the water that’s still trapped in the concrete freezes, it expands by about 9%, exerting even more hydrostatic pressure. This repeated cycle of salt crystallization and ice expansion is what causes the surface to flake away (scaling) or pop out in larger chunks (spalling). You might first notice efflorescence, a white, powdery residue, which is a key sign that salts are migrating out of the concrete. Over time, hairline cracks form, providing even more entry points for water and salt, accelerating the degradation until the structural integrity is compromised.
Visually identifying the stage of damage is crucial. Look for these signs:
- Surface scaling: The top layer is peeling or flaking in thin sheets, like a sunburn.
- Spalling zones: Deeper, crater-like pockmarks where larger chunks of concrete have broken off.
- Crack patterns: A web of fine, hairline cracks that indicate internal stress.
- Aggregate exposure: The smooth cement surface has worn away, revealing the small stones underneath.
How to Pressure Wash Salt Away Without Driving It Deeper into the Pores?
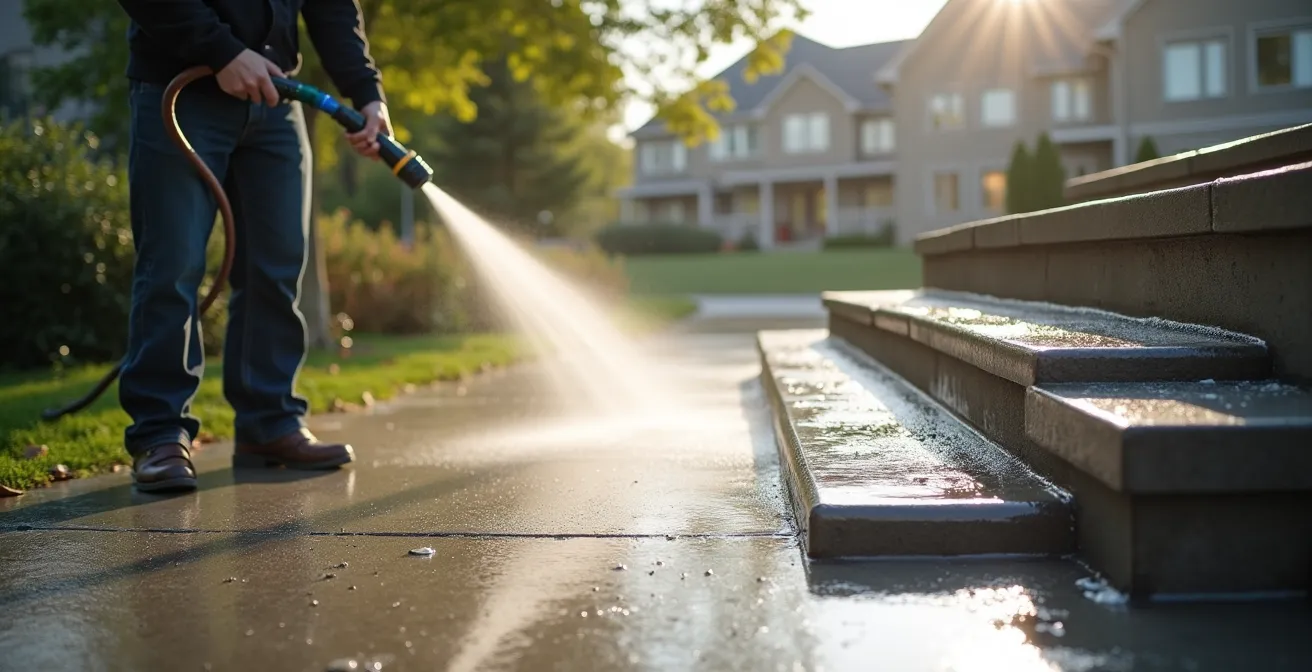
Using a pressure washer to remove salt is like performing surgery with a sledgehammer if not done correctly. High pressure doesn’t just clean the surface; it can violently drive the salt-laden water deeper into the concrete’s capillary network, saturating it for the next destructive freeze-thaw cycle. The secret isn’t power, but process. The goal is to dissolve the surface salt and gently rinse the solution away, not blast it into the pores. This is achieved with a two-pass wetting technique.
First, use a wide-angle nozzle (40 degrees or more) or even a simple garden hose with a “mist” setting to thoroughly wet the entire surface. Let the water sit for 10-15 minutes. This allows the water to dissolve the salt crystals on and just below the surface, creating a saline solution. The second pass is the rinse. Keeping the pressure low, you’ll work from the highest point to the lowest, gently washing this solution off the steps and away from the concrete. This low-pressure, high-volume approach coaxes the salt out instead of forcing it in.
The “right” pressure is critical and depends entirely on the age and type of your concrete. Blasting older, more fragile concrete with high PSI is a recipe for immediate damage. As this chart shows, different surfaces demand different approaches.
| Concrete Type | Age | Maximum PSI | Nozzle Type |
|---|---|---|---|
| Heritage/Pre-2000s | 20+ years | 1200 PSI | 40° or wider |
| Modern Air-Entrained | 5-20 years | 1500 PSI | 25-40° |
| New High-Performance | <5 years | 1800 PSI | 25-40° |
| Exposed Aggregate | Any | 1000 PSI | 40° minimum |
Cleaning vs Sealing: What Is the Priority After a Heavy Salt Winter?
After a harsh winter, homeowners often rush to seal their concrete, believing it’s the best way to prevent future damage. This is a critical mistake. Sealing concrete that is still filled with salt is like putting a lid on a boiling pot. You trap the destructive chlorides inside, where they will continue their cycle of crystallization and expansion under the sealer, causing delamination from below. Therefore, the absolute, non-negotiable priority is cleaning first, sealing second. You must ensure every last trace of salt is removed from the concrete’s pores before you even consider applying a protective coating.
The timing for this process is dictated by the Quebec climate. You cannot effectively clean or seal concrete when it’s frozen or saturated with meltwater. A proper maintenance schedule is your best defence. Applying a sealer also has a strict temperature window; for most professional-grade silane/siloxane sealers, the ambient and surface temperature must be within a specific range. For instance, many guidelines specify an application window between 40-90°F (4-32°C), and the concrete must be bone-dry.
Here is a seasonal timeline tailored for a typical Quebec year:
- April-May Priority: As soon as nighttime temperatures stay consistently above 4°C for a week, perform a thorough deep cleaning to remove all salt residue.
- June-July: Allow the concrete to dry out completely during the warmest, driest part of the year. This step is crucial for allowing trapped moisture to evaporate.
- Late August-September: This is the ideal window for sealing. Apply a quality penetrating silane/siloxane sealer when the concrete’s moisture content is below 4% and no rain is forecast for at least 24 hours.
- October: Conduct a final inspection before winter, spot-treating any areas you may have missed.
- November: For the first frost, use sand for traction instead of salt to minimize the initial chloride load.
The Hot Water Mistake When Washing Salt Off Frozen Surfaces
In a rush to melt ice and wash away salt on a cold spring day, it can seem logical to use hot water. This is one of the most damaging things you can do to your concrete. The phenomenon responsible is called thermal shock. On a day where the air temperature might be just above freezing, the core of your thick concrete steps can still be well below 0°C. When you suddenly douse this frozen mass with hot water, the surface layer expands rapidly while the core remains frozen and contracted. This immense, instantaneous stress differential is often enough to cause immediate and severe surface delamination, where the top layer of concrete sheers off.
As the experts at Concrete Experts Canada note in their guide, this is a common but disastrous error. Their insight captures the physics of the problem perfectly:
The concrete’s core is often still frozen, and hitting it with hot water causes severe thermal shock, leading to immediate delamination.
– Concrete Experts Canada, Salt Damage Prevention Guide
Instead of hot water, the correct approach is patience. You must wait for a day when the ambient temperature is high enough (ideally above 4-5°C for a sustained 24-hour period) to ensure that the concrete slab has thawed all the way through. Only then is it safe to begin cleaning with cool or lukewarm tap water. Trying to rush the process will only trade salt stains for spalling and cracks, a much more expensive problem to fix.
How to Protect Landscape Plants from Salt Runoff During Removal Cleaning?
The same salt that destroys your concrete is also highly toxic to the plants, shrubs, and lawns bordering your steps. The saline runoff from cleaning can change the soil’s pH, dehydrate root systems, and cause “leaf burn” on sensitive foliage. For Quebec homeowners, this is a particular concern for the ubiquitous cedar hedges, which are notoriously sensitive to salt. Protecting your landscaping is a critical part of a responsible cleaning plan and requires a strategy of dilution and diversion.
Before you even begin washing the concrete, the first step is to thoroughly pre-soak the soil in adjacent garden beds with fresh water. This saturates the soil, making it less likely to absorb the initial, highly concentrated saline runoff. For especially sensitive plants, physical barriers are necessary. You can build temporary berms of soil or install plastic landscape edging at a 45-degree angle to channel the water away from root zones. Furthermore, a proactive soil treatment can make a significant difference. Applying agricultural gypsum (calcium sulfate) to the soil around cedar hedges before cleaning helps displace the damaging sodium chloride in the soil structure, mitigating long-term harm to the root systems.
A methodical approach is key to ensuring your cleaning efforts don’t create another problem in your garden. Follow this plan to keep your plants safe.
Your Action Plan: Protecting Landscaping from Salt Runoff
- Pre-soak garden beds with 2-3 gallons of fresh water per square meter before starting any concrete cleaning.
- Create temporary soil berms approximately 6 inches high around the base of highly sensitive plants to act as a physical barrier.
- Install temporary plastic landscape edging at a 45-degree angle to the steps to actively channel the runoff towards a drain or less sensitive area.
- For cedar hedges, apply agricultural gypsum at a rate of 2.5 kg per square meter to the soil 24 hours before you plan to clean the concrete.
- After cleaning is complete, perform a final post-rinse of any affected soil areas with fresh water at a 1:10 dilution ratio (10 parts fresh water to 1 part estimated runoff).
Why Does Urban Pollution Degrade Brick Mortar Faster in Downtown Areas?
While your suburban steps might not be in the heart of downtown Montreal, the science behind urban decay highlights a crucial principle: the combined chemical assault on masonry. In dense urban centres, concrete and brick mortar face a two-front war. They are attacked not only by de-icing salts but also by airborne pollutants like sulfur dioxide and nitrogen oxides. These pollutants create acid rain, which slowly dissolves the essential binding agents in mortar and concrete. When this chemical weakening is combined with the physical pressure of salt crystallization, the rate of deterioration accelerates dramatically. In fact, studies have shown that urban concrete deteriorates twice as fast due to this synergistic effect of pollution and salt exposure.
A key chemical reaction occurs when the calcium hydroxide in concrete interacts with de-icing salts (calcium chloride). This forms a new, highly expansive crystal called Calcium Oxychloride (CAOXY). As seen in the rapid decay of heritage buildings on the Plateau Mont-Royal, CAOXY crystals grow inside the pores and create immense internal pressure, leading to crumbling and erosion. This effect is intensified by the constant freeze-thaw cycles. This “chemical cocktail” of urban pollution and heavy salt use creates a uniquely aggressive environment that typical residential concrete is not always designed to withstand.
This illustrates that salt damage isn’t happening in a vacuum. The overall chemical environment around your home plays a significant role. Even in suburban areas, proximity to major roadways can increase exposure to both salt spray and pollutants, making preventative sealing even more critical. The lesson from our downtown cores is that masonry is under constant attack, and a robust defence requires protecting it from all chemical threats, not just salt.
Does Soft-Washing Keep Mold Away Longer Than Standard Power Washing?
While pressure washing is a mechanical process that uses force to remove contaminants, soft-washing is a chemical one. It uses low-pressure applicators (often no stronger than a garden hose) to apply a cleaning solution that does the work. For salt removal, this usually involves a salt neutralizer that dissolves the chlorides. For organic stains like mold and algae, it involves a biocide that kills the organisms at the root. The answer to whether it keeps mold away longer is unequivocally yes. Standard power washing only blasts away the visible surface mold, leaving the microscopic roots intact in the concrete’s pores. Mold inevitably returns, often within a few months.
Soft-washing, by using a biocide, eliminates the organism entirely, providing much longer-lasting results. In the context of salt removal, this method is particularly interesting because its low-pressure nature aligns perfectly with our core principle of not driving contaminants deeper into the concrete. A sequential process can even tackle both salt and mold. First, a salt neutralizer is applied and allowed to dwell. After a gentle rinse, a biocide can be applied to handle any organic growth. This makes it a compelling, albeit more complex, alternative to traditional power washing for delicate or badly stained surfaces.
The choice between methods depends on the primary problem and the condition of the concrete, but the differences in mechanism and outcome are stark.
| Method | Mechanism | Salt Penetration Risk | Mold Prevention |
|---|---|---|---|
| Power Washing | Mechanical | High – drives salt deeper | Temporary |
| Soft-Washing | Chemical | Low – dissolves surface salt | Long-term with biocide |
| Wet Vacuum | Extraction | Minimal – removes solution | Neutral |
Key takeaways
- The primary cause of damage is not the visible stain but the sub-surface crystallization of salt, amplified by the freeze-thaw cycle.
- Safe cleaning prioritizes process over power: dissolve salt with a low-pressure pre-soak before gently rinsing it away. Never use hot water on frozen concrete.
- Cleaning is the absolute first priority. Only apply a penetrating sealer in late summer or early fall on completely clean and dry concrete.
How to Prepare Your Garage Floor to Resist Salt Damage Before December?
The battle against salt damage is won with proactive defence, not reactive repairs. While your exterior steps face the brunt of winter, your garage floor endures a concentrated assault from the salty slush that drips off your vehicle all season long. Preparing this indoor surface is one of the most effective actions you can take. The cost-benefit analysis is clear: professionally sealing a garage floor is a minor expense compared to the alternative. While sealing concrete costs less than $1 per square foot, replacement can run $16-20 or more, not including the disruption.
An effective pre-winter defence plan is an integrated system that addresses the garage, the exterior, and the transition zone between them. The best protection for a garage floor is a topical coating, like a two-part epoxy or polyaspartic coating. Unlike the penetrating sealer used outdoors, these coatings form a thick, impermeable barrier on the surface, preventing any salt or water from ever reaching the concrete. This should be applied in the warmer, drier months of late summer or early fall to ensure proper curing.
A comprehensive salt defence plan for a Quebec home involves multiple layers:
- Indoor Strategy: Apply a two-part epoxy or polyaspartic coating to the garage floor in September for maximum protection.
- Outdoor Strategy: Apply a penetrating silane/siloxane sealer to the exterior steps and walkway in late August or September.
- Transition Zone: Install heavy-duty, water-absorbent entrance mats at all doorways, especially the one from the garage to the house.
- Winter Maintenance: Perform a monthly rinse of the garage floor with a simple water and vinegar solution (1 cup per gallon) to neutralize salts before they accumulate.
Protecting your concrete is an investment in your property’s value, safety, and curb appeal. By shifting your mindset from reactive cleaning to a proactive, year-round maintenance schedule, you can transform your concrete from a recurring winter casualty into a durable, long-lasting asset. Take the time this season to implement these strategies and give your home the expert-level defence it deserves.